
 |
| Gathering the tools and equipment to mess around with my boat |
This past Easter I took delivery of a Yamaha G3 1756 VBW complete with a 40HP four stroke Yamaha motor from John and his fantastic staff at River City Marine. My latest boat is 17 feet long and 56 inches wide providing a stable presentation platform, not only for myself but for my family, clients and students alike. The 56-inch width provides added security over my previous 14’ jon boat for those who don’t have the best sense of balance or ‘sea legs’. I can’t wait to use it to chase stillwater trout, pike, walleye and lake whitefish.
There is nothing as frustrating as inadequate or poorly prepared equipment. This is true with watercraft and boats in particular. If your equipment, or lack thereof, dominates your thoughts it limits your ability to focus on fishing and impacts your success.
With this thought front and center I set about preparing my new boat for the upcoming season. Taking the time and do the job right as I installed decals, anchor cleats, carpeting and pedestal seats. Outfitting a boat is blend of your personality and the realities of your boat. So what I do to my boat my not necessarily work for you. But, I am often asked about how I set my boat up and why. Here are the details.
 |
| License numbers in place |
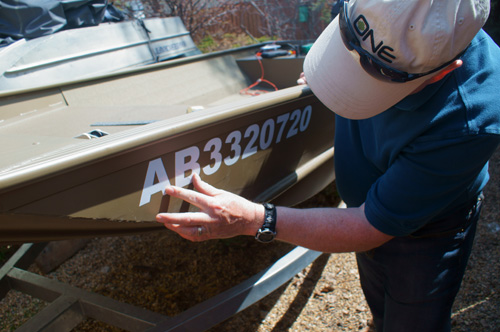
My first step involved the installation of my pleasure craft license numbers. As my new craft has a motor in excess of 10hp Transport Canada requires a pleasure craft license. I must clearly display the license numbers on the sides of the boat above the waterline as close to the bow as possible. The license numbers must be at least 7.5 centimeters (3 inches) high; and of a color that contrasts with the color of the boat. Since my base color is olive I contacted a local printer and $20 later I was the proud owner of a set of white decals. As my new boat was clean and new I easily installed the numbers along both sides of the boat.
 |
| I used a Scotty Anchor Lock for my rear anchor |
Next, I installed my anchor cleats. In my opinion anchor cleats are a must. Deploying anchors should be a safe simple operation. Fumbling around with cleats or tying knots to some part of the boat makes anchoring a challenge and should a fish decide to carry the fight around the anchors you will be hard pressed to raise them out of the way.
 |
| Removing the front access cover |
I prefer pyramid anchors as they hold well on soft bottoms common to most lakes. When guiding and instructing I often anchor broadside so 30 pound anchors fore and aft would be needed. Anything less and I risked having the boat become an annoying distraction if it swayed or shifted in the wind.
 |
| Drilling the holes for the bow anchor |
For the rear cleat I used one of Scotty’s indestructible anchor locks. During the destructive testing phase of their development Scotty’s composite locks supported casting molds up to 200 pounds! My 30 pound pyramid would not be a problem. The Scotty Anchor Lock is probably the best on the market today. I use them whenever possible on my boats and pontoon boats.
 |
| Front anchor system in place |
For the bow anchor I needed extension out from the boat so when moving from one spot to another the swinging anchor would not batter the boat. John at River City Marine offers an excellent aluminum anchor system that easily removes for storage or covering the boat for transport.
On my new G3 access to the upper bow area is through a small access cover. My youngest son, Sean still has long skinny arms. I was able to con and coerce him to reach through the access hole to attach the stainless steel nuts and lock washers. He did a wonderful job and didn’t drop one nut or lock washer. I took over for the final nut and promptly dropped a washer into the bowels of the boat, so much for age and experience.
With the anchors installed I turned my attention to the bow seat. The comfortable padded bow seat would be mounted on a 15-inch pedestal complete with recessed base. The base required me to drill a 3.5-inch hole using a bi-metal hole saw through the upper aluminum deck. Good friend Brian Chan has the same boat so I had a template to work from. Brian provided me with the measurements from his boat which I transferred to mine. Prior to drilling I did a test hole on a scrap of plywood to make sure the hole was wide enough to accommodate the recess of the pedestal base. If it had been too small it would have been nearly impossible to make a 3.5-inch hole larger. An ounce of prevention is worth a pound of cure!
 |
| The moment of truth, drilling the 3.5" hole for the front pedestal seat |
I must have measured six times to be certain before committing to the drill. I held my breath as the pilot drill of the hole saw began to turn and burrow through the deck. If you have never drilled a large hole hold on tight to the drill. When a large hole saws first bites into the aluminum deck the drill feels like it is going to be wrenched from your arms. Surviving the initial shock the first hole went perfectly. I then had to drill a second hole through a support gusset directly below the first hole in the deck plate. The pedestal base slipped into both holes. Flush to the deck as advertised.
Prior to bolting the pedestal base in place I cut and fit a piece of black carpet runner to the upper deck. I recommend carpeting all horizontal surfaces. Carpet protects the boat from scratches and chips but more importantly it protects fly lines from being ground under feet and provides an element of stealth by muffling noise. Water is denser medium than air, any clanging and banging about travels through the water alerting any nearby fish of your presence.
 |
| Melting the frayed ends of the front carpet |
On my previous boats I glued the carpet down. This time I wanted to be able to remove the carpet for easy cleaning. Carpet runner has a heavy backing providing weight to ensure the carpet doesn’t blow away when the boat is running at top speed. I cut a hole in the middle of the carpet section for the pedestal base and then melted the frayed ends using a barbeque lighter.
 |
| My son Sean sitting on the installed bow seat |
My G3 came with a factory installed vinyl floor which at first glance seems quite fly line friendly. If the boat hadn’t come with the floor I would have been fashioning a plywood floor and covering it with carpet as I had done for previous boats. A plywood sub floor prolongs boat life, particularly riveted boats, by distributing weight and avoiding ‘oil canning’ issues. Oil canning stresses rivets and leads to a never ending parade of leaks that always need attention. On a traditional V hulled boat floor boards provide a flat comfortable base to stand on, both fore and aft. Carpeted floorboards are a welcome addition to anyone who has spent any time in the bow area of a traditional V hull boat.
 |
| Measure twice, no five times, before drilling. |
The last step for the day involved installing the rear pedestal. As with the bow pedestal it required a 3.5-inch hole. This time through the vinyl floor and the 1.5 inches of Styrofoam underneath the floor but obviously not though the hull. All went well. As I couldn’t bolt the pedestal base through the aluminum floor due to access issues I had to secure it to a 1/4-inch thick section of aluminum plate. This plate was in turn secured to the floor and into the support gussets that run underneath the floor board. I used #14 self-tapping stainless steel sheet metal screws. As with the front seat I was working from a proven template from a friend’s boat. The rear pedestal base is rock solid.
 |
| Phase one complete, now just the sounder and rear carpet left |
By days end all was done. I was sore, tired and a little sunburn in a few spots. I still have to put the rear carpet, build a cover for the battery and engine compartment and install my new Hummingbird sounder. Stay tuned for part two detailing these procedures.
By days end all was done. I was sore, tired and a little sunburn in a few spots. I still have to put the rear carpet, build a cover for the battery and engine compartment and install my new Hummingbird sounder. Stay tuned for part two detailing these procedures.
Great work!
ReplyDeleteWhat an adventurous journey you've shared! Navigating through serene waters while contemplating life's intricacies sounds truly enriching. Your vivid descriptions painted a tranquil scene. Thanks for sharing this valuable resource. If you want boat detailing in Seattle feel free to contact me at Deckhand Detailing.
ReplyDeleteThanks for sharing this post!
ReplyDeleteMobile Boat Detailing Trinity Fl